Getting started
Ada allows external developers to create, register, and publish integrations that enhance the platform’s capabilities. This guide walks you through the complete integration process, from development to deployment.
This guide uses a Knowledge API integration as an example.
Implementation example
To see a working code sample implementation for creating a knowledge integration, visit our public repository for complete details: ada-integrations-demo.
Before you begin
Make sure you have the following:
-
Access to an Ada development bot: Use a sandbox bot specifically for testing and developing your integration, not a live bot. This bot should be dedicated exclusively to managing integrations.
-
A basic understanding of OAuth 2.0 flows – Familiarity with OAuth authentication is essential for integrating securely.
- See the OAuth overview for more details on how Ada uses OAuth for integrations.
Step 1: Set up your integration server
The first step is to build an integration server that Ada can communicate with when AI agent managers install your integration. Your integration server will be responsible for several tasks:
-
Handle OAuth callbacks from Ada.
- Your server must provide an endpoint to handle OAuth callbacks. This is the URL that Ada’s dashboard will call after the AI agent manager authorizes your integration.
- If you’re familiar with OAuth 2.0 flows, this URL typically looks like:
- The endpoint will:
- Receive an authorization code via the
codequery parameter. - Exchange this code for access and refresh tokens within 5 minutes.
- Store installation details, including the installation secret.
- Receive an authorization code via the
- In the next step, when registering your integration, you’ll specify this URL in the
oauth_callback_urlfield.
-
Manage access and refresh tokens securely.
- Store the access and refresh tokens securely.
- Always overwrite the refresh token with the latest value. The Ada authorization server issues a new refresh token each time one is used as a security best practice.
-
Complete the integration installation flow.
- Implement any custom logic required for your app (for example, fetching articles via the Ada Knowledge API).
- Update the integration status to
completein Ada by calling the Integrations API.
-
Handle success and error states.
- Redirect users to the appropriate success or error page.
-
Implement token refresh logic.
- Ensure your server can refresh tokens when needed.
-
Ensure HTTPS accessibility.
- Your integration server must be accessible through HTTPS for security and compliance.
Step 2: Register your integration with Ada
Before your integration can interact with Ada, you need to register it with your development bot. This process involves generating an API token, sending a registration request, and securely storing the credentials. Once registered, your integration is owned by your development bot, meaning any future modifications must be made using the same bot handle and an API token from its dashboard.
-
Generate an Ada API key.
To authenticate requests, obtain an Ada API key from your integration development bot.
-
Send a request to register your integration.
Once you have an API token, use it to send a request to Ada’s platform to register your integration. This request establishes your integration within the system, enabling it to interact with Ada’s APIs. Ensure that all required fields are correctly populated to avoid registration errors.
Request fields
This callout goes over some of the key request fields that you must provide when registering your integration.
scopes
These are the permissions that will be granted to your integration’s access tokens, and dictate which API endpoints your integration will be able to use.
-
Current valid scopes are:
articles:readarticles:writearticle_tags:readarticle_tags:writeknowledge_sources:readknowledge_sources:writeplatform_integration_installations:readplatform_integration_installations:write
-
platform_integration_installations:readandplatform_integration_installations:writepermissions are always granted to your integration, even if you don’t explicitly include them in thescopesfield, since you will always need them. -
More scopes will become available as more APIs become available.
configuration_fields
Configuration fields come with a lot of context. Please make sure to read through the following at least once before attempting to register your integration with Ada:
- This field describes the form that we render to collect config info from the AI manager in the dashboard.
- The schema must be defined according to the
json-schemastandard: https://json-schema.org/docs. - The schema supports a variety of form fields, including:
- string (text)
- boolean
- number
- arrays of fields
- string enum (select field)
- array string enum (multi-select field)
- Ada does not support the following
json-schemafields:- text area
- file upload
identifier_field_path
- Friendly name for admins to find the installation in the Connections list in the Ada dashboard.
- The AI manager provides the value of this friendly name;
identifier_field_pathdescribes which part of theconfigurationinfo should be used as the name. - The format of this field should be a
jmespath. - It should refer to a required, string field within the
propertiesdescribed inconfiguration_fields.
tags
- The tags assigned to an integration dictate which parts of the dashboard the integration appears in.
- Currently
knowledgeis the only supported tag.
Request example
Shell -
-
Store the integration credentials.
After successfully registering your integration, you will receive a response containing essential credentials, including the
idandclient_secret. These values uniquely identify your integration and are required for authentication and API requests. Store these keys securely to prevent unauthorized access. You will need them for future authentication requests to securely interact with Ada’s APIs. -
Understand ownership and future requests.
- Your integration is now owned by your development bot.
- Any subsequent requests to view or update the integration must include the same bot handle and an API token generated using its dashboard.
- This token does not have to be the exact same one used for the initial registration request.
Step 3: Implement the OAuth and token refresh flow
This section guides you through the essential steps of building an OAuth flow, including managing authorization codes and ensuring tokens are refreshed securely to prevent authentication failures.
OAuth overview
Creating a secure and reliable OAuth flow ensures that integrations can authenticate and maintain access to Ada’s resources. This involves setting up an OAuth callback endpoint to handle authorization responses and implementing token refresh logic to maintain user access.
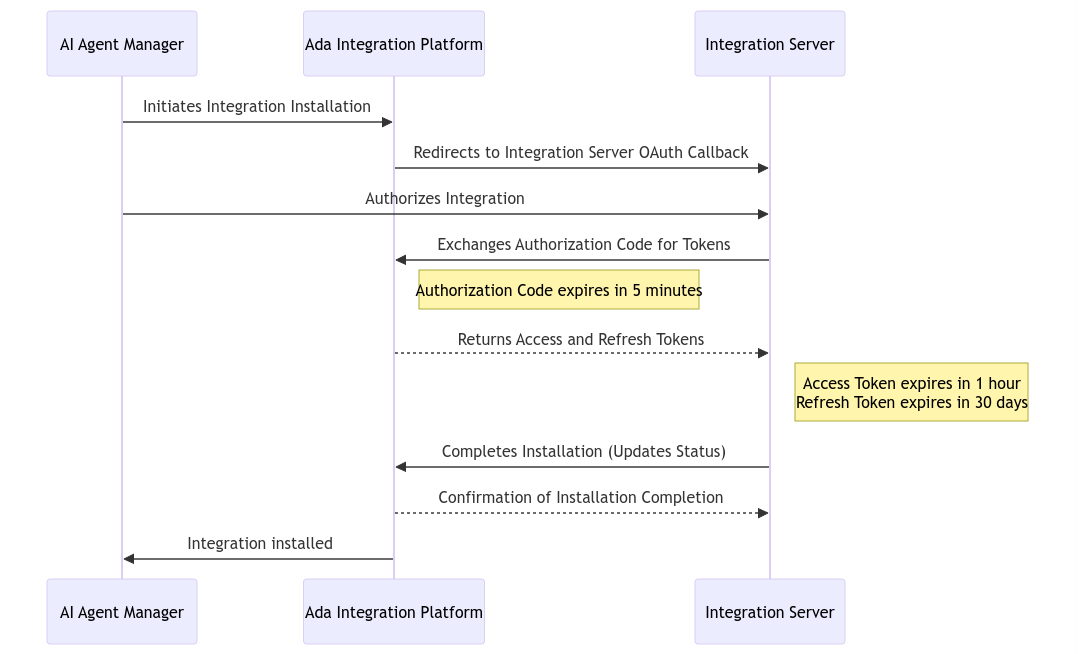
Here are the steps involved in creating an OAuth flow:
-
Integration installation initiated.
The AI Agent Manager (User) starts the installation process on Ada’s Platform, indicating they want to add a new integration.
-
Redirect to Integration Server.
Ada’s Platform recognizes this request and redirects the user to the Integration Server’s OAuth callback. This step prepares the Integration Server to handle the user authorization flow.
-
Authorization by user.
The AI Agent Manager provides authorization details (e.g., credentials or consent) on the Integration Server’s interface, permitting the integration to access Ada’s resources as needed.
-
Exchange Authorization Code for Tokens.
-
Tokens issued.
In response, Ada issues:
- Access Token (valid for 1 hour)—used for authentication in API requests.
- Refresh Token (valid for 30 days)—used to obtain a new access token when it expires.
These tokens allow the Integration Server to securely communicate with Ada’s APIs.
After receiving the user authorization, the Integration Server sends the obtained Authorization Code back to Ada in order to request valid tokens (Access Token, Refresh Token).
The Authorization Code expires in 5 minutes, requiring timely exchange. -
-
Completion of installation.
With valid tokens in hand, the Integration Server notifies Ada that the integration setup is complete—this involves updating the integration status and finalizing configuration steps by calling Ada’s platform APIs as needed.
About OAuth endpoints
There are two OAuth endpoints for token exchange and installation details, respectively. The token exchange endpoint can be used for retrieving the initial set of tokens as well as for requesting a new refresh token. Use the /self endpoint to list the details of an installed integration for use in subsequent calls to the Integrations API.
Exchange authorization code for tokens
This endpoint returns authorization and access tokens in exchange for the code returned to your OAuth callback.
Request a new refresh token
Fetch details of an installed integration
OAuth implementation
-
Create your OAuth callback endpoint.
Set up an endpoint on your server to handle OAuth callbacks and securely process authorization codes. When Ada’s platform redirects users to this endpoint, extract the authorization
codefrom the request and exchange it for access and refresh tokens by making a request to Ada’s OAuth token endpoint. Once the tokens are received, store them securely to authenticate future API requests. Finally, complete the installation process by performing any necessary post-authorization setup.Example
Python -
Implement token refresh logic.
Access tokens expire periodically, requiring a refresh to maintain access. Your integration should store the refresh token securely and use it to request a new access token before expiration. This involves detecting token expiry, exchanging the refresh token via Ada’s OAuth endpoint, and securely storing the new stokens while avoiding reuse of the old refresh token.
Example
PythonOur authorization server issues a new refresh token each time one is used, automatically revoking the previous token. If a refresh token is used more than once, the server will return an error response:{"error": "invalid_grant"}.
Step 4: Handle the installation flow
To properly manage an integration’s lifecycle, you need to implement mechanisms for both installation and uninstallation. Handling installation ensures that your integration can retrieve necessary configuration details and function correctly, while a proper uninstallation process allows for clean removal when the integration is no longer needed.
-
Retrieve installation details.
Once an integration is installed, your system must retrieve essential installation details from the Ada Integrations API. These details include configuration parameters that your integration may need to function properly. Using the OAuth access token, you can fetch the installation ID associated with the integration instance.
After retrieving the installation ID, mark the installation as complete by making an authenticated API request to Ada’s platform.
Example
Python -
Implement an uninstallation endpoint.
When a user uninstalls the integration, the platform sends a DELETE request to your system. Your endpoint must validate the request using Ada’s HMAC-based signature to prevent unauthorized removals. Upon verification, extract the installation ID, remove stored credentials and related data, and return a
200 OKresponse to confirm successful uninstallation. Properly handling this step ensures a clean removal process, preventing orphaned data and maintaining security.Example
Python
Step 5: Test your integration
Before deploying your integration, thoroughly test the installation, configuration, and uninstallation processes to ensure everything works as expected.
-
Access the integration settings.
Open your development bot dashboard and navigate to
https://{bot_handle}.ada.support/platform/integrations/{integration_id}. This page allows you to manage and test your integration’s setup. -
Fill out the configuration form.
Enter the required details in your integration’s configuration form. Ensure that all necessary fields are completed and validate that the provided information is correctly saved.
-
Complete the OAuth flow.
Authenticate your integration and verify that it successfully completes the OAuth process. Confirm that the authorization code is exchanged for access and refresh tokens and that these tokens are stored securely.
-
Verify installation status.
Check that the integration is correctly installed and functioning as expected. Ensure that it retrieves necessary installation details and can interact with Ada’s APIs as intended.
-
Test the uninstallation flow.
If needed, remove the integration and confirm that the uninstallation process works smoothly. Verify that stored credentials are deleted, API access is revoked, and no orphaned data remains.
Step 6: Ada approves and publishes your integration
Once you’ve thoroughly tested your integration and you’re ready to publish, submit your integration to developer-partnerships@ada.support.
Be sure to include the following:
- Your development bot handle
- Integration ID
- Demo video illustrating the in-app experience of installation, OAuth, configuration, and how the integration interacts with Ada’s app
- An icon image representing your integration