Zendesk Ticketing
Overview
The Zendesk Ticketing app lets your customers create email support requests, then sends them to your Zendesk Support team. For those familiar with Ada’s original Zendesk Email Ticketing block, the functionality is essentially the same; however, the new app gives you more control over the information that is shared with your Zendesk Support environment. It also adds the opportunity to further customize the ticket directly from the AI Agent.
Here are some examples of ticket customizations supported by the Zendesk Ticketing app:
-
Set the ticket Subject
-
Set the Request Type
-
Update the Ticket Status
How a Zendesk Ticketing handoff works in Ada
The primary goal of a ticketing handoff Answer is to collect information from the customer to share with your support team. You need to capture the customer’s contact information and their issue details. Once this is done, the Zendesk Ticketing app can complete the process by sharing that information with your Zendesk environment.
The Zendesk Ticketing app is a passive block. This means that it does not capture any data from the customer by itself. Any customer information you wish to pass to your Zendesk environment using the Zendesk Ticketing app must be collected separately as variables.
Let’s look at the three blocks necessary to build out a Zendesk ticketing handoff.
Capture blocks
Capture blocks capture information directly from the customer and save it as a variable.
You can capture anything you think is relevant for the support request ticket; however, there are three pieces of customer information you must capture for a most effective ticketing experience:
-
Name
-
Email
-
Support issue
The Name and Email variables are critical requirements. Without them, the Ticketing app is not considered complete and the Save button won’t illuminate. Though Support Issue is not a block requirement, in most cases it is essential that you capture this information. Without it, the Zendesk agent assigned to the ticket may not know what the support request is about.
-
The Name and Email variables must be titled exactly as listed above so that Zendesk recognizes them as customer profile variables and maps them correctly.
-
Set the Capture block Validation to email when capturing the customer’s email address. This ensures the customer enters a valid email address by allowing the block to reject an entry that is not formed in an email address format.
The Fetch Chat Metadata block
The Fetch Chat Metadata block is necessary to capture conversation transcript and metadata, and save it as a local, global, or sensitive variable.
Attaching the customer info and the chat transcript to a handoff dialog is only possible by using the Fetch Metadata block.
The Zendesk Ticketing app
The Zendesk Ticketing app is the main component of a Zendesk Support request handoff, also known as a ticketing handoff. Once triggered, a ticketing handoff gathers the support request information from a customer. This information is then used to create a support ticket in your Zendesk environment. The Zendesk Ticketing app’s job is to connect with the Zendesk API, which in turn takes that information and creates the ticket.
Configure the Zendesk Ticketing App
To use the Zendesk Ticketing App, you must first connect Ada with your Zendesk Support account.
You’ll need the following information from Zendesk:
-
Your company’s Zendesk subdomain
-
A neutral Zendesk admin email
If you have everything in order, then let’s start:
-
On the Ada dashboard, go to AI Agent profile > Handoff. Then, on the Integrations tab, beside Zendesk Ticketing, click Connect. The Zendesk Ticketing window appears.
-
In the Zendesk Ticketing window, enter your Zendesk Subdomain.
-
Enter your team’s Zendesk Login Email. This must be an admin level account.
Use a general admin account that’s not associated with a specific person. If, for any reason, you downgrade or remove this person’s Zendesk account, then the integration will break and support tickets are no longer sent. On the other hand, a general admin account is not very likely to have its admin privileges revoked.
-
Enter your Zendesk API Token.
If you need to create a new token, be sure to use the same admin account you used to connect Ada with your Zendesk account.
-
Click Save.

Gathering the information required to create a ticket
The following customer information is necessary to create a Zendesk ticket:
-
The customer’s name
-
The customer’s email
-
The chat transcript
You can gather the customer’s name and email address by using Capture blocks to ask them for it directly. Remember to place the Capture blocks before the Zendesk Ticketing app block.
The chat transcript, however, must be captured using the Fetch Chat Metadata block to save it as a variable. This variable can then be attached to the ticket, typically in the Comment field.
The Fetch Chat Metadata block
-
Click the Select Action drop-down menu, then click Fetch Chat Metadata.
-
Under Select Variables for Inputs, add the chatter_token metavariable to the Chatter Token field.
-
[Optional] Under Save Response as Variables, click the Select Optional Variable drop-down menu, and select the options you’d like to capture in variables.
Unlike the original Zendesk Ticketing block, this new block does not automatically capture the chat transcript or customer info (i.e., the metadata that is immediately recorded from a customer’s browser/device). You must select the optional variables in this step in order to pass them to the Zendesk ticket.
-
Assign variables to the options you selected in step 3.
It is best practice to give variables the same names as the field titles. Use chat_transcript and chatter_info, respectively.
-
Under Fallback Answer, click Edit response to update the Error Fallback dialog to serve your customers in case of a connection error with the Zendesk API.
-
Click Save.
Use the Zendesk Ticketing app block
-
On the Ada Dashboard, drag and drop the Zendesk Ticketing App block into your handoff Answer.
-
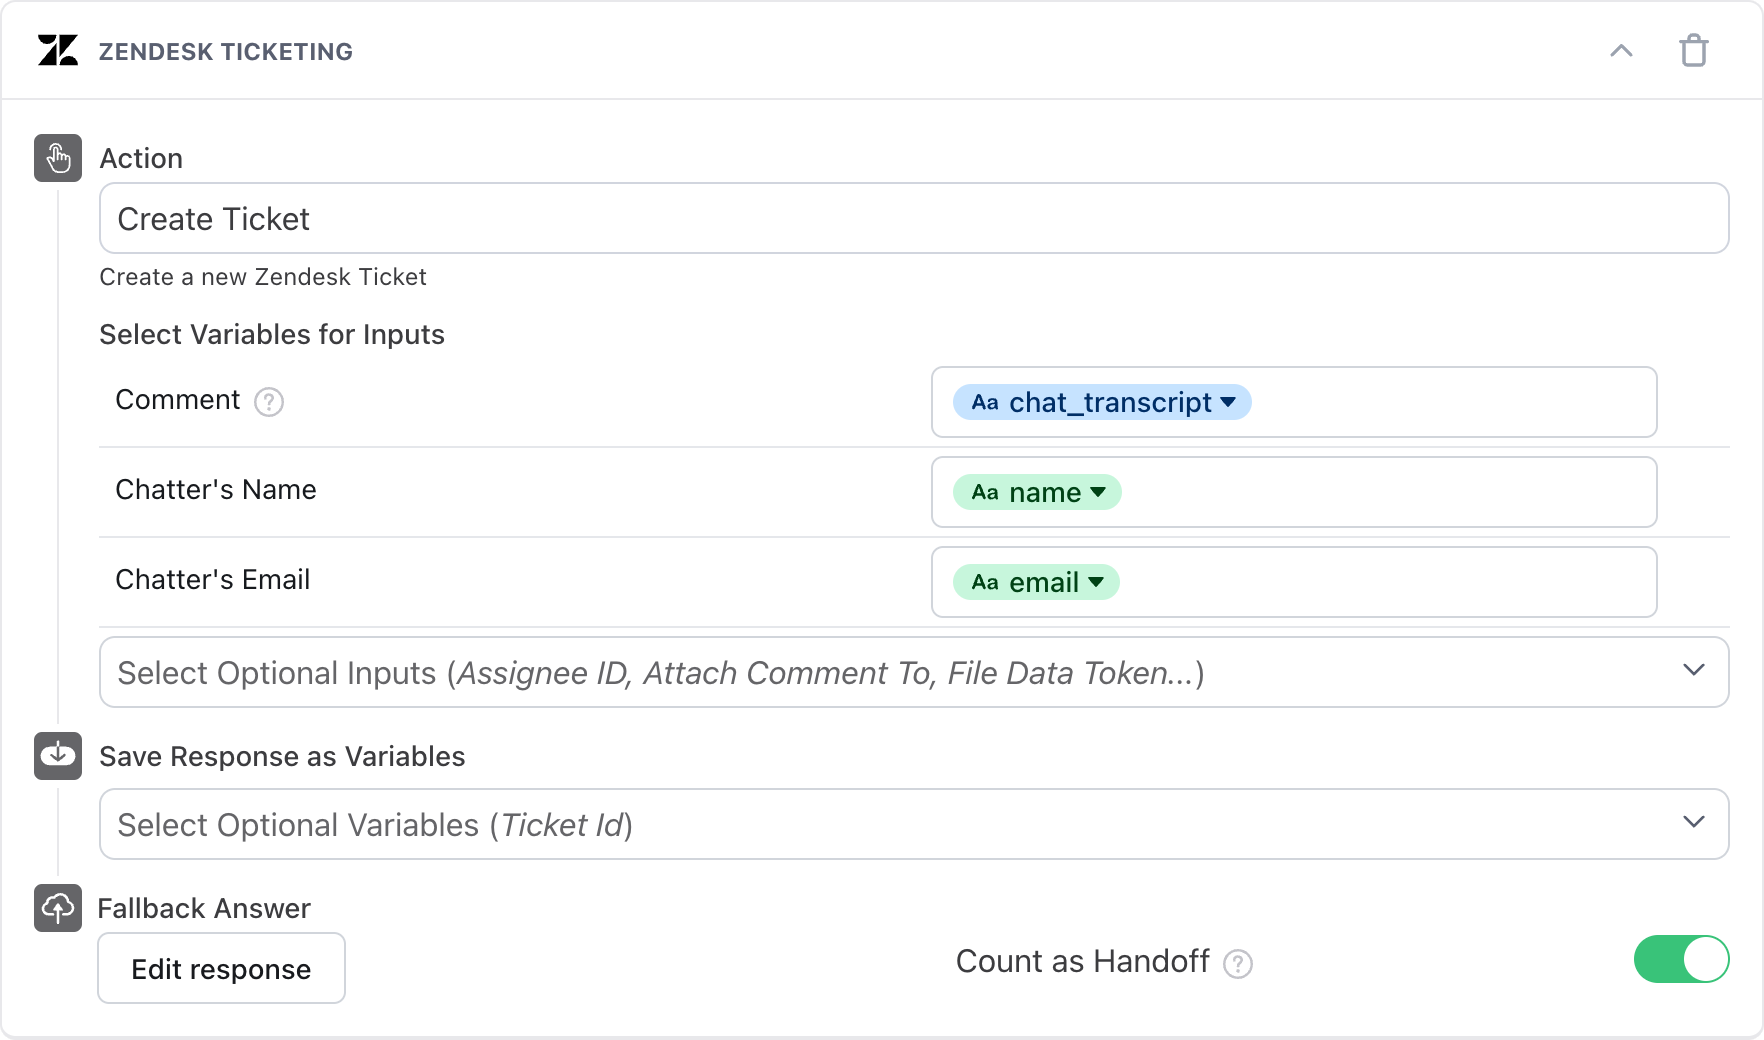
Click the Select Action drop-down menu, then click Create Ticket. The Select Variables for Inputs section appears.
-
Complete the mandatory input fields, and any optional input fields as needed. Use the following tables to understand the requirements for each field.
You may see more inputs in your Optional Inputs drop-down menu than the three constant options listed in the table below. The menu populates with additional input options dynamically, based on what is available in your Zendesk Support environment.
-
Under Save Response as Variables, click the Select Optional Variables drop-down menu, then select Ticket ID.
-
Click Choose a Variable, and select an existing variable, or create a new variable, to capture the Zendesk ticket’s Ticket ID.
-
Under Fallback Answer, click the Choose an Answer drop-down menu, then select a variable to display if an error occurs during the block’s operation.
-
Beside Count as Handoff, turn the toggle on to include these handoffs in your AI Agent’s reporting.
-
Click Save.
You’re done! The Zendesk Ticketing App block is now configured for creating support tickets.